This is a tutorial illustrating how I paint my mechs.
The first step is cleaning flash and moldlines off the miniature and basing it. I use bases made from airdrying modelling clay (Faber Efaplast Classic). An alternative that needs baking in the oven is Fimo.

Applying primer is the second step. I use diluted white Gesso applied with a brush. Gesso is cheap and sticks to everything. White Gesso ensures that all colors cover very well and works great with washes. Use only a thin layer of Gesso – it’s Ok if the gray metal color still shines through.

With the primer applied and dry it’s time for the basecoat. Since this mech will feature my “Hinterhalt” camo I used GW Desert Yellow – a color that doesn’t cover very well, which is not an issue over white Gesso. It’s better to apply the basecoat in two thin layers rather than one thick layer.

The next step is applying camouflage – skip this if you go for a scheme with even colors only. I apply the camo with an airbrush since it gives nice feathered edges, but a brush may work just as well.

The basic paint scheme is completed. Now it’s time for painting details in contrasting colors. I usually use grey for vents and joints, metallic colors for weapons and jump jets. The cockpit window is filled in with black. Painting the details breaks up the basic paint job and makes the miniature look more detailed. I also apply the main color to the base at this time – in this case GW Graveyard Earth.

The miniature still looks very flat, which we will adress with shading and highlights. One way to get shading (darker color for recessed areas) is drybrushing the base color over a black basecoat – I prefer working with washes. The GW washes work very well. I apply them undiluted with a not too large brush so I can control them. Gryphonne Sepia, Devlan Mud, and Badab Black were used. Once again, it’s better to apply a little twice than too much once (although it’s possible to correct the latter by immediately flowing it away with clean water).

With the washes dried, highlights are drybrushed on to bring out the edges. Dip a larger brush into your highlighting color (which should be a similar color, but much lighter, than your basecoat – I used GW Bleached Bone for this one), wipe on a piece of cloth or paper until it’s almost dry, then brush it over the edges of the miniature. Make sure there’s just a tiny bit of paint left on the brush, and only the edges will be accented.

The miniature is now basically finished. I go a step further by jewelling the cockpit, making it look like it is reflecting the ambient light. Progressively use lighter shades of the same color on smaller areas. Colors complementary to the basecoat (red for green, orange/yellow for blue…) often work very well. I use shades of blue. Jewelling can also be applied to the lenses of lasers.
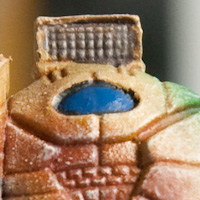
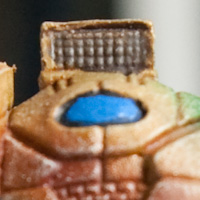
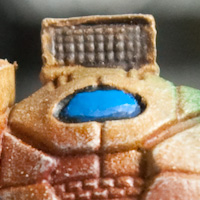
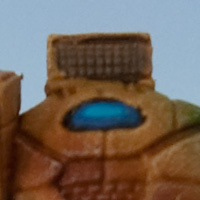
I also apply a decal and then a coat of matte varnish from a spray can or using the airbrush. The varnish removes the shine and protects the miniature. Gloss varnish brushed onto the cockpit brings back the shine to what’s supposed to be glass. The base is finished with flock.
